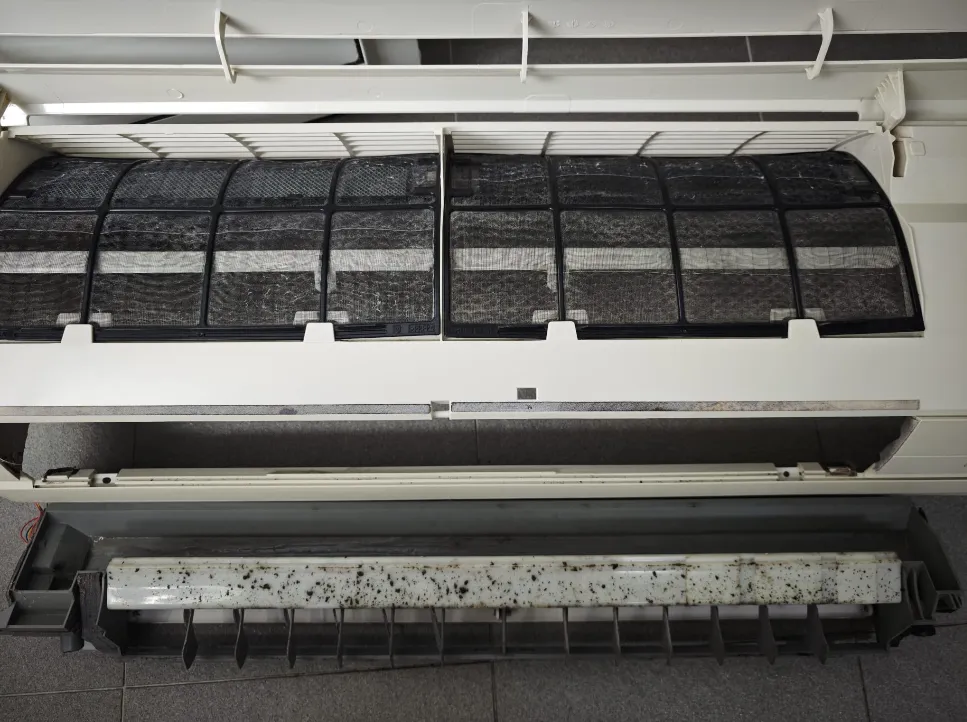
You notice it on a Sunday morning. A dusting of tiny black specks on the bedsheet, or a dark line on the wall under the indoor unit, or a row of dark dots on the flap that opens when the aircon runs. You wipe it off, and a week later it is back.
Most owners ask the same two things: what is it, and is a normal service enough to stop it? This post sets out where the specks usually come from, a few checks you can do safely from the floor in ten minutes, what not to do, and which job on our price list matches which situation. It is about the machine only. If anyone in the home has asthma or allergies, the specks are a reason to book sooner rather than later, but we are an aircon company, not a doctor, so ask a doctor about symptoms.
What the specks usually are
We cannot tell you from a photo of a bedsheet exactly what a speck is, and nobody honestly can. What we can tell you is the short list, in the order we usually see it when a unit is opened up:
- Mould or biofilm growing on the parts that stay damp. Inside a running aircon the coil and the parts just after it are wet, and Singapore's humidity means they rarely dry out fully. Dust lands on a wet surface, stays, and darkens. In time it can flake off and drop or blow out as dark specks.
- Dust that has packed into a felt and is letting go. A neglected filter lets fine dust through to the coil and the fan behind it. Once the layer is thick, small pieces come away.
- Dirt on the airflow vane itself. The flap at the bottom of the unit that directs the air sits in the stream, so it picks up a film and then dark dots. This one is easy to see: open the vane's path and look along it with a phone torch.
- Something that is not from the aircon at all. Incense, candles, cooking soot, traffic dust coming in through a window, or the weeks after haze can all leave dark particles on the wall and bedding. An aircon sits in the same room and gets blamed.
The photo at the top of this post is from one of our jobs. It shows an indoor unit with the front panel opened: the filters are loaded with dust and the long flap under them is dotted with dark specks. It is a typical "before" picture, not a picture of your unit, and it is there so you know what to look for.
Where you find them tells you something
Before you do anything, note where the specks are. It narrows the cause and gives the technician a head start.
- On the airflow vane or the louvres at the outlet. Dirt has built up in the airflow path. This is the most common place and the easiest to confirm.
- On the wall or ceiling just below or beside the unit. Something is dropping or being thrown out of the unit as it runs. It is worth taking seriously, because it means build-up inside has become loose enough to move.
- On the bed, desk or floor near the unit. The same as above, but check the room too. If you also have specks on a shelf across the room that has no aircon above it, the aircon may not be the source.
- In the water that drips or is wiped off the unit. Dark, slimy drips point at the drain tray and the drain path rather than the vane. Read why an aircon drain that keeps choking never stays cleared if water is also a problem.
Ten minutes of checks from the floor
None of these needs a tool beyond a phone torch and a clean white tissue, and none involves opening anything except the front panel that is meant to open.
- Switch the unit off at the remote and wait for the vane to close. Do not run it while you inspect it.
- Photograph the specks as they are. Take one wide shot showing where on the wall or bed they are, and one close shot. This is the single most useful thing you can send us, and it stops you from wiping the evidence away.
- Touch one speck with a white tissue. If it smears grey or black and feels a little greasy or damp, it is more likely a mould or biofilm film. If it lifts off as dry dust, it is more likely dirt.
- Look at the filters. Lift the front panel the way the manual shows. If the mesh is covered by a grey felt that you cannot see through, that alone explains weak airflow and fine dust past the filter. Our guide to washing aircon filters yourself and where DIY stops covers how to rinse them and where that stops being the answer.
- Shine the torch along the vane and the grille. Note whether the dots are only on the flap or also on the plastic behind it.
- Check the room. Have you been burning incense or candles? Cooking with the kitchen door open? Was there recent haze? If so, wipe the wall and see whether the specks return after a few days of those being avoided.
If the filters are clean and the specks keep coming back, that points to something behind the filter. Filters are the only part meant for you to handle, so that is where your job ends.
What not to do
- Do not spray cleaner, bleach or anti-mould spray into the vents or at the coil. Liquid reaching the control board turns a cleaning job into a repair job. Chemical on the coil also needs to be rinsed out, which a spray bottle does not do.
- Do not keep running the unit for weeks hoping it settles. Whatever is loose in there will keep getting blown out.
- Do not rely on wiping the vane to fix it. A damp cloth on the outside of the vane is fine for tidying up once the unit is off and the photographs are taken, but it only deals with what you can see. The source is behind it.
Which job matches which situation
The prices here are the ones on our pricing page today. Every service booking begins with the 9-point pre-check. Its eighth point is a filter and coil dirt assessment: we tell you whether the unit needs a general service or a chemical wash, and the pre-check page says we never sell you the wrong one. Its seventh is a damage and corrosion check, and its fourth is the drainage flow check, which matters if the specks come with drips.
- Normal servicing is the routine job: the roller and blower are dismantled, then the filter, coil and drainage are cleaned and flushed, with a basic check. It is $55 for 1 unit, $90 for 2, $120 for 3, $160 for 4, and $35 per unit from 5. If the specks are light, the filters are only moderately dusty and the unit was serviced not long ago, this may be the right size of job.
- A chemical wash is the deeper clean. The roller is dismantled, a water tray and cover go on, chemical is applied to the coil and the blower, then it is rinsed, the drainage is flushed and the unit is tested. It is $135 for 1 unit, $245 for 2, $345 for 3, $425 for 4, and $100 per unit from 5. Our pricing page recommends a chemical wash every 6 to 12 months. A unit that is throwing specks onto the wall and has also had a musty smell is the situation it is for.
- A chemical overhaul is the full-disassembly job, recommended every 2 to 3 years or for severely fouled units. It is $200 for 1 unit, $370 for 2, $515 for 3, $640 for 4, and $150 per unit from 5. It makes sense when a previous wash helped only for a few weeks, or the pre-check shows the build-up is heavier than a wash will reach.
The pre-check is what separates these, not the symptom alone. If you decline the recommended work after the pre-check, the $55 minimum covers the visit and diagnosis and nothing more. If you go ahead, the $55 is part of the total and is not charged twice.
For why a unit can look serviced and still shed dark flakes, read the blower wheel and what a general service does not reach. For how to decide between washing one unit and every unit in the flat, see chemical wash every aircon or just one.
What a repeat of the specks means
If the specks come back within weeks of a service, do not assume the first job was wasted. Ask three things:
- Which job was it: a general service, a wash or an overhaul?
- Was the blower looked at, and can you be shown the photograph?
- Was the drain clear? A drain that holds water keeps the unit damp, and damp is what the build-up needs.
Our note on what your aircon technician should show you before they leave lists the things worth seeing before the panel goes back on, so the next visit leaves you with evidence rather than a feeling.
Before you message us
It helps to have these ready, because they let us tell you which job a visit is likely to need:
- The two photographs from step 2: the wide shot and the close shot.
- Where the specks are: the vane, the wall below, the bed, the drips.
- What the filters looked like.
- When the unit was last serviced or washed, and which job it was.
- Whether there is also a smell or weak cooling.
If you would like us to look at it
Send us the photographs and tell us which unit it is. We will tell you what a visit would cover and what is quoted on the day. WhatsApp us on 9107 2601 and we will tell you what a visit would cover before we come.